.webp)


Windows already has a built-in screen recording tool called Xbox Game Bar, but did you know that Microsoft PowerPoint too has a screen recording tool? If you own Microsoft Office and are looking for a screen recorder, this is definitely good news!
Using it is ridiculously easy – it takes four simple steps to record just about anything on your screen!
Let’s look at how you can record your screen using PowerPoint, as well as how to carry out some basic editing with it.
Can you record your screen on PowerPoint?
Yes, PowerPoint PowerPoint has a built-in screen recording feature that allows you to capture your computer screen. The recording gets automatically added to your presentation, but you can also save it as a video file on your computer.
You can capture any on-screen activity, whether you’re using an app, browsing the web, or playing a game. Unfortunately, the last option isn’t the best use case for PowerPoint, as the resulting gameplay recording has choppy framerates. For capturing a game, it’s better to use other specialized tools.
How to screen record on PowerPoint: Step-by-step
To screen record on PowerPoint, here’s what to do:
Step 1: Open the PowerPoint app and create a blank presentation.
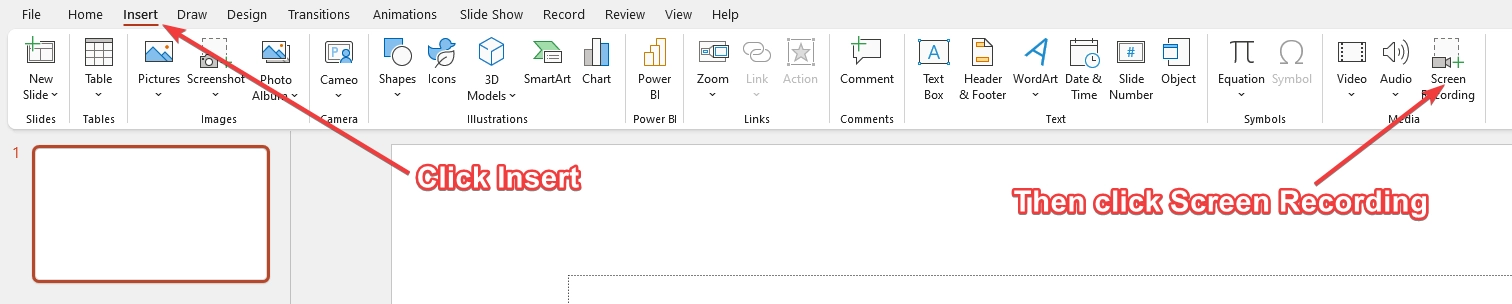
Step 2: Click on the “Insert” tab, and then click on “Screen Recording” towards the end of the toolbar.
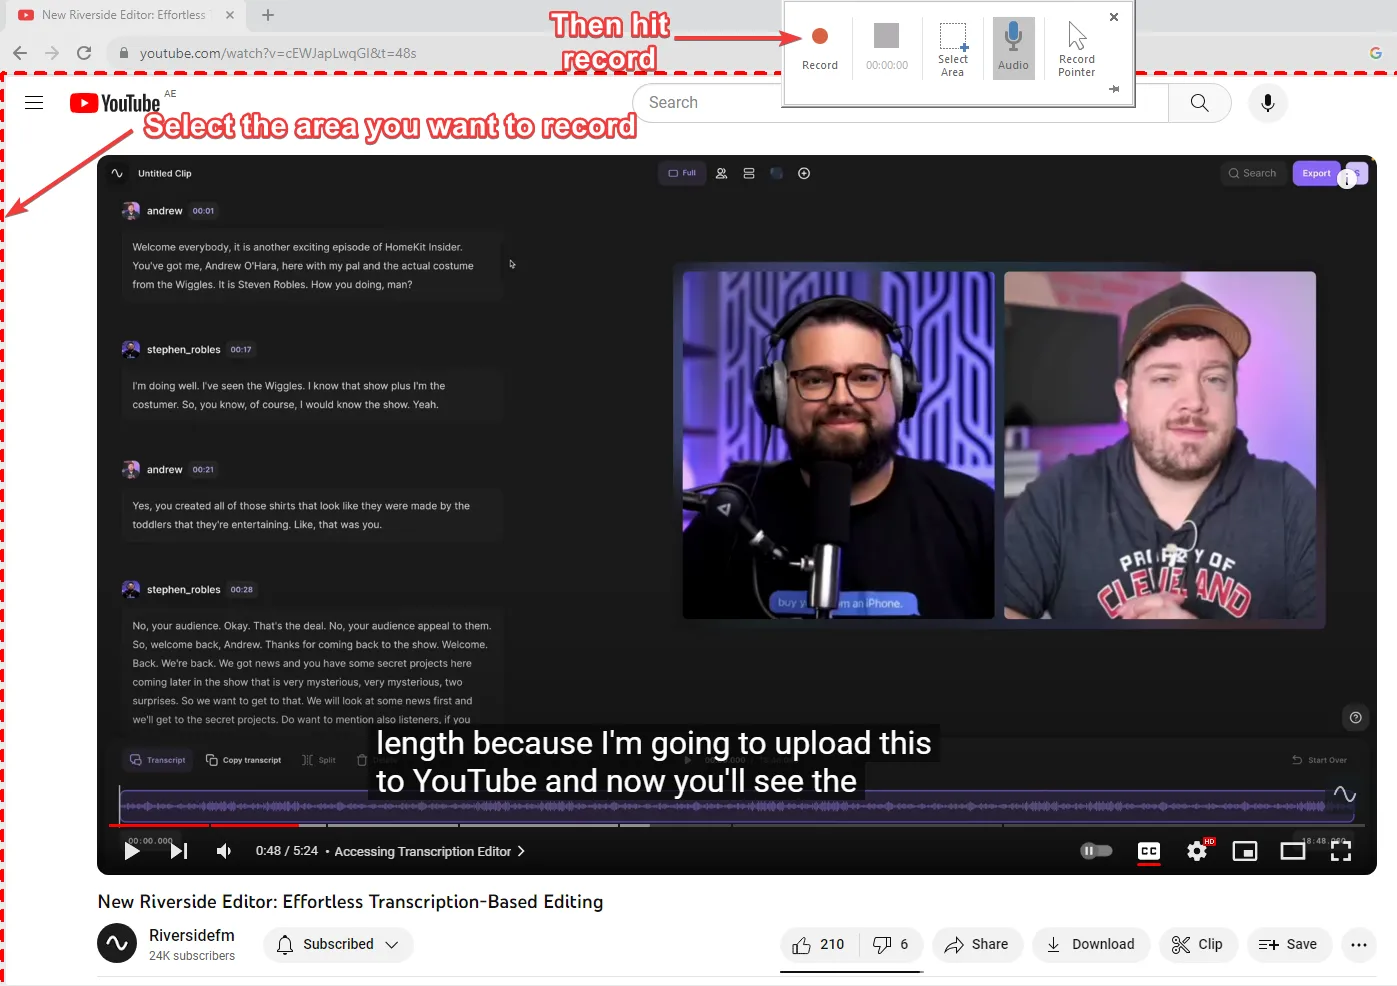
Step 3: Select the area you want to record. Then click on “Record” to start recording.
Step 4: To stop the recording, press the Windows+Shift+Q keys.
If you want to save your recording as a video file on your computer, just right-click on the recording and choose “Save Media As” from the drop-down menu. Then save the video in your preferred folder.
How to edit your PowerPoint screen recording
While PowerPoint isn’t a professional editing suite, it still has some functionalities to adjust and customize your screen recording. You can trim your recording, adjust its style, and customize playback settings on PowerPoint. We’ll look at how to do each of these below.
How to trim your PowerPoint screen recording
If you’d like to trim your screen recordings directly on PowerPoint you can follow these steps:
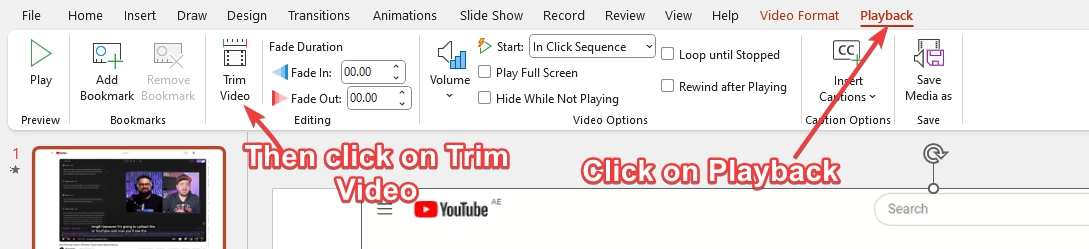
Step 1: Go to the screen recording slide and click on the video.
Step 2: Click on the Playback tab. Then click on the Trim Video box.
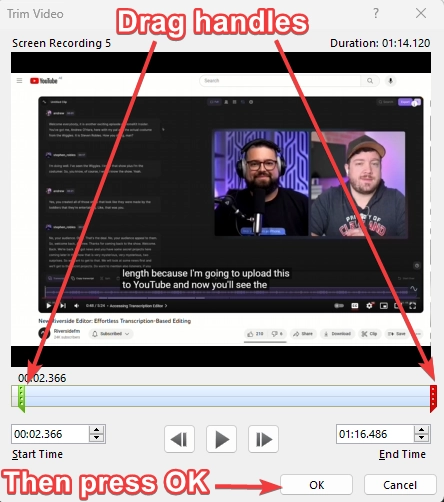
Step 3: A mini box will open up where you’ll see a green handle that serves as the video starting point and a red handle that serves as the ending point.
Drag these handles to select the part that you want to be trimmed out. Then click OK to apply the change.
Adjusting your recording’s style
PowerPoint has a few set layouts for recording. Each of these offer you different borders, shapes or dimensions, effects and more. If you’d like to customize your recording style, here’s how:
Step 1: Go to the screen recording slide and click on the video.
Step 2: Navigate to the “Video Format” tab and go to the “Video Styles” section.
There, you can change the video Shape, Border, as well as add Effects to style your video. To do any of these, just click on their respective sections in the Video Styles tab, and make your changes.

Customizing playback settings
If you’re looking to adjust the way your recording plays, then you’ll need to go through playback settings.
Here’s how to customize playback settings:
Step 1: Go to the screen recording slide and click on the video.
Step 2: Navigate to the “Playback” tab. There, under “Video Options”, you can do the following:
- Start: Choose how to play the video (“Automatically”, “In Click Sequence”, or when “Clicked On”).
- Play across Slides: Enable this option if you want the media to continue playing across multiple slides.
- Loop until Stopped: Enable this option if you want the media to play repeatedly in a loop.
- Rewind after Playing: Enable this option if you want the media to rewind to the beginning after it finishes playing.

Read more: How to Video Record Yourself Presenting a PowerPoint
Is PowerPoint best for screen recording?
While PowerPoint is a decent screen recorder, it suffers from a few issues. It doesn’t have a good built-in editor to carry out extensive editing, nor does it record gameplay well. When we recorded Starfield’s gameplay using PowerPoint, the video turned out to be choppy and unwatchable.
If you’re unsatisfied with PowerPoint’s recording after trying it, then a great alternative to check out is Riverside. With Riverside, you can capture both your screen and webcam, making it ideal for creating video tutorials, reacting to content, or live streaming.
.webp)
While you can easily share and record your screen, Riverside has a special feature for recording presentation slides.Our presentation recorder uses local recording to capture your slides in up to 4K. You can assign someone to control your slides so you can focus on what counts. We’ll record your presentation as a synced separate track to your audio and video for a seamless editing experience.
Your video and audio is also captured locally, which means everything records on your actual device instead of relying on your internet connection. This way, even if your internet quality fluctuates, the recording of your presentation will be in pristine quality.
Riverside also comes with an easy-to-use editor that you can use to edit your recordings in no time at all. With text-based editing you can trim your recordings as easily as deleting text transcript. You can also use our tools for AI audio enhancement, highly accurate captions and custom layouts to polish off your video presentation easily.
Key features
- High-quality video recording resolution of up to 4K and audio recording of up to 48kHz.
- Local recording for high-quality video that doesn’t depend on your internet connection.
- Presentation recorder that captures slides and presenter’s audio/video in high quality
- Record in separate audio, video, and screen share tracks for easy editing and content repurposing
- Built in teleprompter so you can keep on track, all in one platform
- Host a recording session with up to 7 remote guests
- AI audio fine-tuning (background noise remover and audio level normalization)
- Producer mode that lets you invite someone to manage the technical aspects of your remote recording, while you focus completely on hosting
- Transcriptions in over 100 languages using the best of AI tech.
- Text-based video editing, so editing your recording is as simple as editing a text transcript.
- Magic Clips feature that uses AI to find the most important bits of your recording and turns them into shareable, short clips.
- Add custom branding to your videos, including background and logos
How to screen record with Riverside
If you’d like to give Riverside a try, sign up and follow these steps to start recording your screen (and presentations).
Step 1: Open your browser. Then, create an account with Riverside and log in to it.
Step 2: On the Riverside dashboard, choose an existing studio, or press “+ New Studio” to create one.
Step 3: Enter the studio name and choose the recording type.
Step 4: Click “Join Studio” after choosing your preferred settings.
Step 5: Click the “Share” button and then “Screen”. Choose the screen that you want to record. You can record your whole desktop, a window or a tab.
It’s also possible to upload a presentation. Simply click “Share” then “Presentation”, and upload your slides.
Step 6: When you’re ready and all setup, you can click “Record” to start recording.
Step 7: After you’re done recording, click Stop recording.
Step 8: Click “View Recordings” to go to the recordings.
In the following screen, click on the recording you just made. Then, you’ll find your screen recording along with the webcam recordings.
Step 9: Download the recording or view the recording in the cloud. You can also edit the recording in the editor.
FAQs on PowerPoint Screen Recordings
How long can PowerPoint screen record?
You can record on PowerPoint for however long you want; it doesn’t have a specific time limit.
Why is screen recording not working on PowerPoint?
Screen recording may not be working on PowerPoint due to various reasons, such as software bugs, outdated PowerPoint versions, or issues with your computer. Here are ways to fix the issue:
- Restart PowerPoint: Close the software and relaunch it. Check if the screen recording feature works after restarting.
- Restart your computer: Reboot your computer to fix potential issues, then launch PowerPoint and check if the screen recording feature works.
- Run PowerPoint in Safe Mode: Press Windows + R, type "powerpnt /safe", and hit Enter. Now try screen recording and see if it works.
- Update PowerPoint: Ensure you have the latest version of PowerPoint installed.
- Reinstall PowerPoint: Uninstall and reinstall PowerPoint to resolve potential software issues
If the issue persists, consider using an alternative screen recording software like Riverside.