%20(1).webp)


Self-recorded videos are a great way to create a bond with your audience and show the authentic face of your brand or business. Recording a professional video by yourself can feel daunting, but even without high-end equipment and a filming crew, anyone can create great video content.
By following our tips for video recording yourself, you will soon be creating high-quality professional videos that engage your audience.
How Do You Record a Good Video by Yourself?
From setup to recording and post-production, there are pointers you can follow at every step along the video creation process to get the perfect take. The fundamentals of producing professional videos include:
- having strong presentational skills
- optimizing sound and video quality
- creating the ideal recording environment.
The equipment you use will play a role in the overall quality of your footage, however anyone can make good content just by filming on their phone. Don’t let a lack of experience stop you from trying.
Once you understand how lighting, background and other key components play a role in video recording, just remember that practice makes perfect!
Tips for Video Recording Yourself
These 10 tips cover the essentials of recording high-quality videos of yourself. Think of them as the foundation blocks to build your professional video on. The more thought and effort you put into planning your self-shot video, the better the result.
Tip 1: Get Comfortable on Camera
Recording a video of yourself can feel strange, especially if you have never done it before. Although it may be uncomfortable, the best way to feel more relaxed when recording yourself is simply to keep doing it.
Practice talking to the camera and taking test videos of yourself. Imagine you are talking to a friend about how your day has been.
You can watch these videos afterward to check your camera presence. Were you fidgety? Was your voice clear and slow enough?
Having calm and open body language, with a relaxed expression and your shoulders back, will allow you to appear professional and confident.
Tip 2: Get Input From Friends or Colleagues
Show your test videos to someone you trust. This will allow you to get an outsider’s opinion on how well you present yourself, which can be hard to judge on your own. Ask them whether there are moments when your speech is difficult to understand, or when you appear nervous on screen.
Tip 3: Prepare What You Are Going to Say
Frequent pauses or tangents in your speech can make your video appear less professional. Knowing what you are going to say will help you feel more confident and improve the flow and pacing of the video.
Make notes about the topic you are going to talk about. Some people like to develop these into a full word-for-word script. It is best to try to learn your script so that you can maintain eye contact with the camera, without needing to look away and read your notes.
You should rehearse what you are going to say so that you can anticipate your next sentence. Remember though that it is ok to make mistakes. You can edit out any misspoken lines or awkward pauses in post-production.
Tip 4: Use a Reliable Recording Software
Video recording software can streamline your content creation experience. Using a recording platform will enable you to monitor and control your recordings and convert your files into the appropriate format. There’s no need to worry about uploading your recording as this is is often automatic with recording software. Whether you are live streaming or recording a YouTube video, the editing and mixing tools provided by certain recording software makes for a streamlined editing experience.
There are plenty of video recorders out there, but we’ll say that Riverside is one of your best bets. Riverside is a user-friendly platform that provides you with the tools needed to edit and repurpose your videos.
You can increase the professionality of your videos with Riverside’s studio-quality recording software, which renders your footage in high-quality resolution using local recording. Customize your experience to fit your needs, and invite remote guests to join your studio at the click of a button. Use our Media Board to edit live while you record, and keep control over your editing process with separate audio and video tracks.

Tip 5: Wear Comfortable Clothes
Wearing clothes that make you feel good will improve how comfortable you feel. This has a knock-on effect, making your camera presence more confident.
Make sure your clothes match the tone of your video. For example, avoid clothing like sweatsuits for professional formal videos. You should also think about how your clothes interact with your background. Avoid fabrics with busy patterns so your audience doesn’t get distracted.
Tip 6: Choose an Appropriate Location to Shoot From
Depending on the content of your video this could be as simple as your bedroom or living room. For conferences, podcasts, or documentary-style videos consider using a studio, office, or meeting room. Your location should reflect how formal your video will be, and the type of content you are creating.
You will also need to consider the lighting and background in your location, and how you will frame the scene on camera. You can find out more about these elements of recording later in this article.
Tip 7: Optimize Sound Quality
Try to reduce background noise as much as possible. Is there a fan whirring in your room? Or is a heater buzzing somewhere? Even soft sounds can have a large impact on your audio quality, so close any windows, switch off unnecessary equipment, and avoid echoing spaces. It’s best to build up your home studio in a quiet room with as little background noise as possible.
Tip 8: Select the High-Quality Recording Equipment
You don’t need to have a large budget to record professional quality videos. Try using devices that you already have. For example, you can film yourself without a tripod by using a webcam on top of a monitor.
If you have both a webcam and a smartphone, choose the one with the highest video quality to record with.
If you do have the budget to invest in equipment, the best place to start is with a microphone, and a high-quality camera. A reliable microphone is a game change when it comes to audio quality, and since you’re recording video it’s best to use a dedicated camera. That being said, some phones have very impressive cameras that can even capture up to 4K video resolution.
You should also consider boosting your audio quality with the right pair of headphones. This helps you monitor your audio and hear exactly what is being recorded. Choose a pair of headphones that work well for your style of content.
Tip 9: Be Yourself
As you become more confident with your on-screen presence, don’t be afraid to embrace your quirks and mannerisms. Your unique selling point is yourself, so be sure to let your personality shine. You can build rapport with your viewers by showing your character through your videos, which will encourage them to keep coming back for more content.
Tip 10: Practice, Practice, Practice!
How comfortable you feel with being on camera is visible to your audience. Give the best impression of yourself by building your confidence, which will naturally grow the more you record yourself. Think of the content creators you enjoy watching. Many of them have years of practice behind them, which has helped them learn and develop to where they are today.
How to Create the Ideal Setup for Video Recording Yourself
Lighting, background, angling, and framing are the four essential components you should consider before you hit the record button.
Putting time and thought into the physical setup of your video will be reflected in the quality of your footage. Small things, such as forgetting to tidy up your background, can stand out strongly to viewers and affect how professional your video comes across.
Lighting
Daylight is the best natural light you can use in a video. To capture the best soft video lighting, try to shoot in the morning or late afternoon. For more consistent lighting at any time of day, you may want to invest in ring lights.
Remember that the position of your lighting has an effect on video quality. There are certain types of lighting to avoid, for example overhead lighting due to the shadows it creates on your face. Backlight lighting is also something to avoid! This is when light hits you from behind, such as when you stand in front of a window, and also obscures your features and lowers the clarity of your footage.
Background
Check your background for any distractions that might cause the viewer to lose focus. Common examples of this are: askew pictures, dead flowers, and food or drink sitting out. Make your background tidy and presentable, so that your audience’s attention remains on you.
The background itself should be uncluttered and minimalistic. Swap busy backgrounds, such as bright and richly patterned wallpaper, for a simpler space with plain walls.
Angles and layout
If you are filming on a phone, think about where you intend to upload your video so that you position your phone at the right angle. For example, most major video-sharing platforms favor landscape mode rather than portrait. However, portrait recordings are more compatible with some social media platforms such as Instagram and TikTok. Remember to choose the layout that best fits the destination of your video.
You should also consider how close the camera is to your face. As a rule, avoid any severe close-up angles. However, a camera angle focused on your face will increase how close your audience feels to you when they watch your content.
When you set up your phone or camera, make sure the lens is not angled upwards or downwards on your face but is as close to eye-level as possible. The camera should be fully stable and supported, to avoid shaky footage.
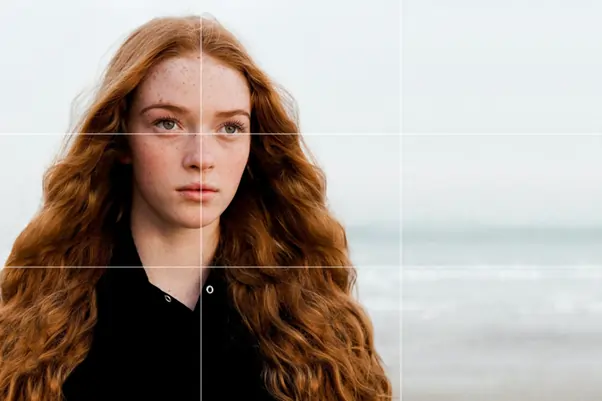
Framing
The physical positioning of objects in a video has a great effect on what grabs your audience’s attention. You also need to make sure that all of your face and the top of your head are in the frame.
When creating a video, remember the rule of thirds. This is a way of thinking about your video as being split into a grid, with two horizontal and two vertical lines.
Naturally, the human eye is drawn to these lines and the points where they intersect, rather than the space in the grid’s squares. So, the most important elements of your videos should align with these lines and intersection points.
You should have your camera positioned so that your eyes, the focal point of your shot, are in the most attention-grabbing part of the grid. This would be along the highest horizontal line, at a point where it crosses a vertical line. Your viewer will then be naturally drawn to look at them as you speak.
How to Film Yourself Like a Professional With Riverside.fm
Create high-quality professional videos by recording yourself on Riverside. You can film anything from podcasts and interviews to TED talks right from your desktop, or through our mobile app. It only takes a few simple steps to get started with Riverside.
How to Record Yourself on a Desktop
Step 1: Create an account on the Riverside website.
Step 2: Create a studio by pressing the purple ‘+ New Studio’ button in the upper right corner.
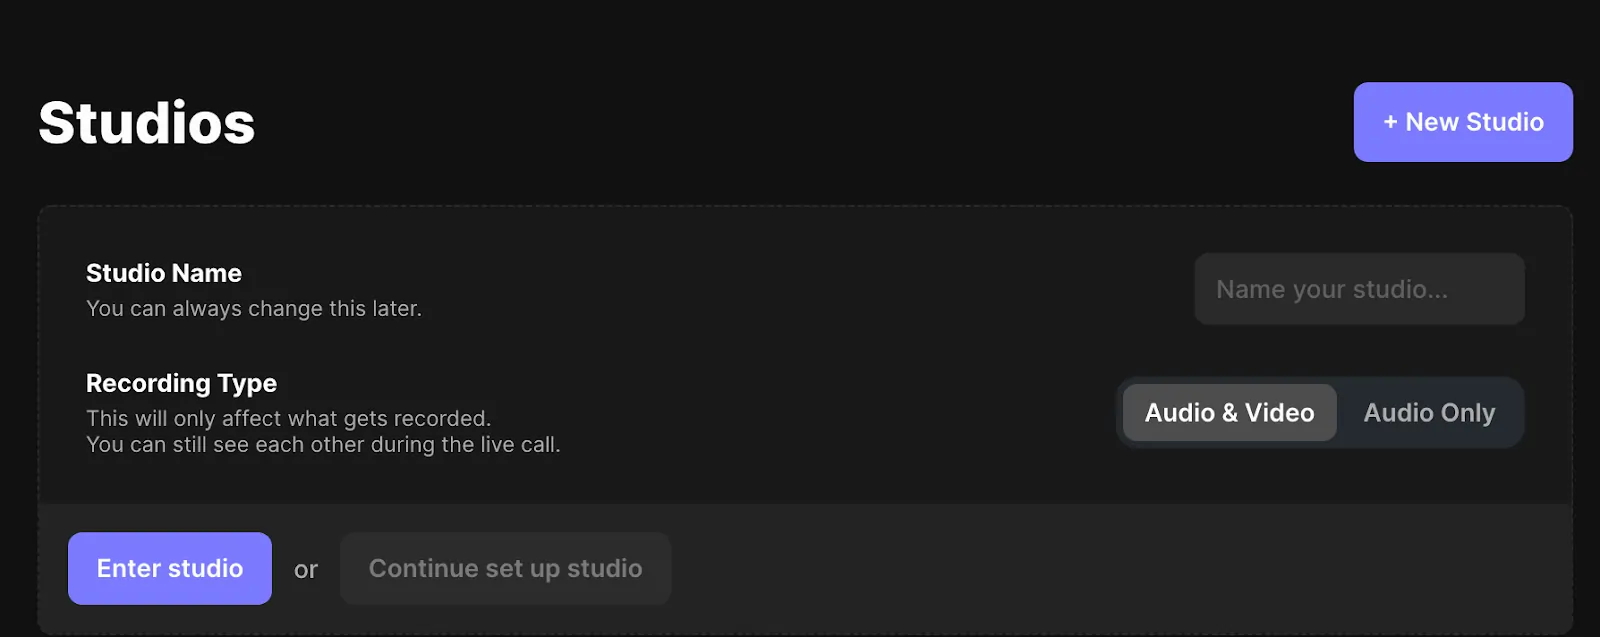
Step 3: Give your studio a name, and select your recording type – either audio and video or audio only.
You can enter your studio immediately or select ‘Continue to set up studio’ to schedule a recording for later.
Step 4: Navigate to your studio settings. You can do this in the dashboard via the gear icon on the right of the studio title, or you can do this by selecting the studio and clicking on ‘Settings’ in the lefthand menu.
Here you can select your resolution, use noise reduction, and more to optimize the quality of your recording.
Step 5: When you are ready, click ‘Go to studio’ in the top right-hand corner. Input your host name and select whether you are wearing headphones. When you’ve selected and tested your equipment, click 'Join studio’.
.webp)
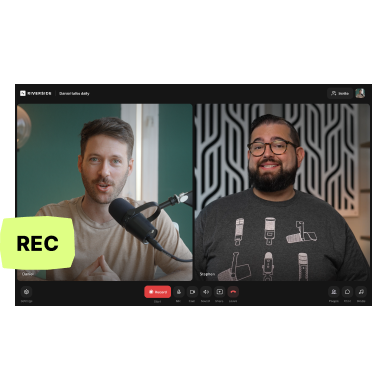
Step 6: In the studio, check your camera angle in the preview box on the left. Your recording has not yet begun, so take time to readjust your camera if needed.
When you are ready, select the red Record button at the bottom of the screen.
.webp)
Step 7: Riverside will begin local recording, rendering your video in high quality.
When you have finished filming, click Stop in the lower left corner.
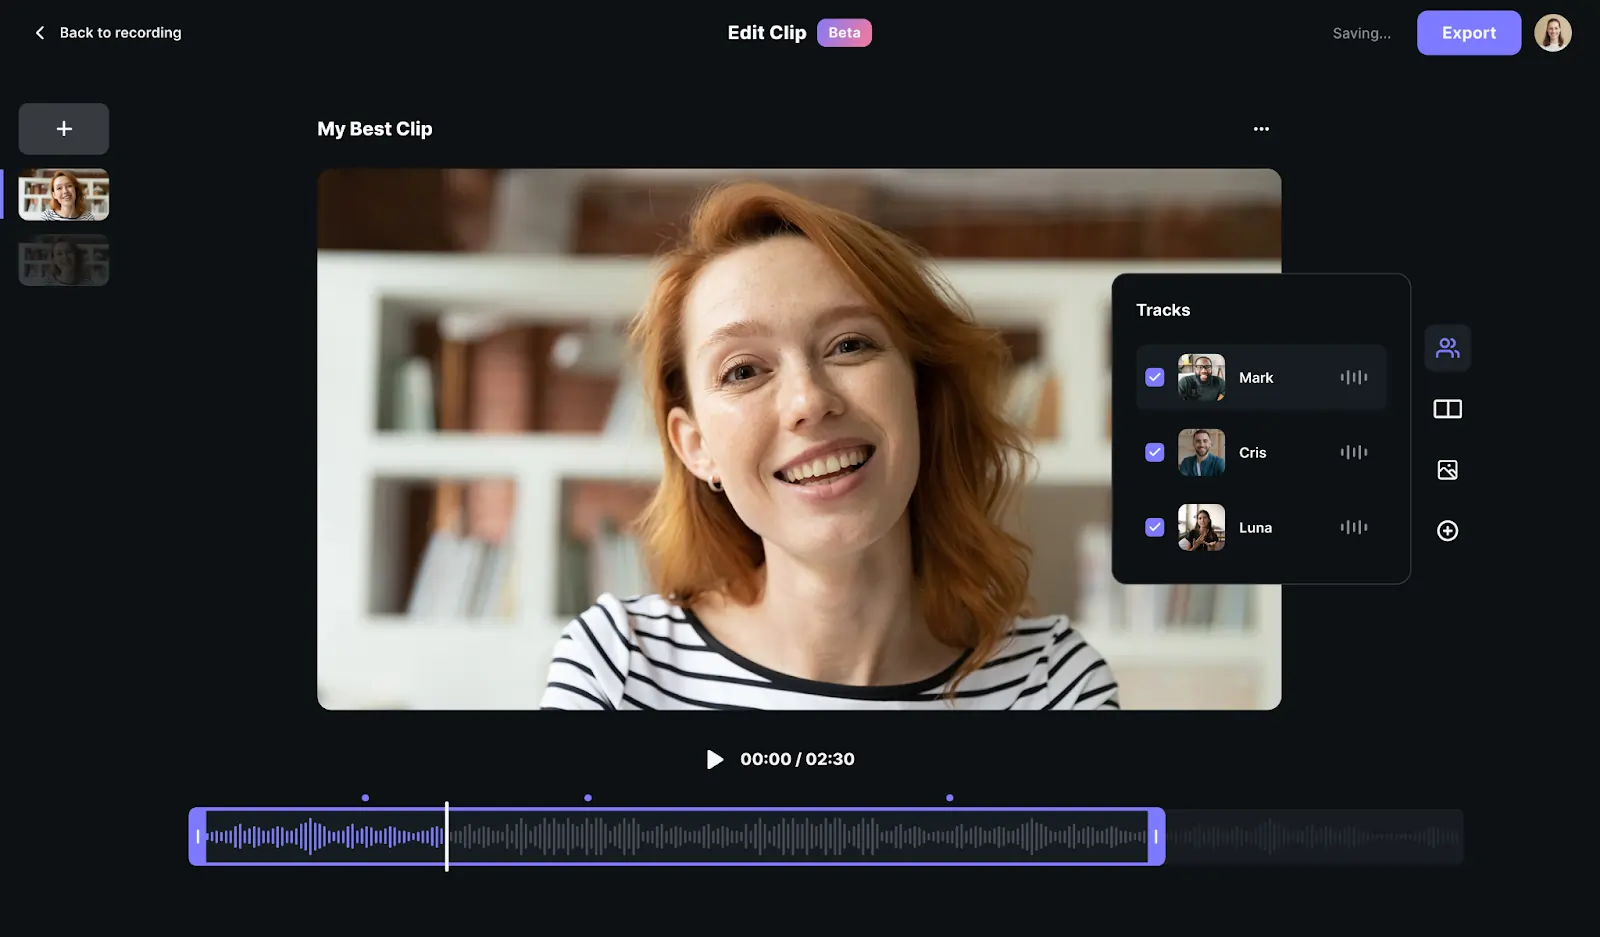
Step 8: Wait for all recordings to upload and then click the purple ‘View Recordings’ button on the right. From here, you can select and download your video by clicking the ‘Download’ button or you can select the ‘Edit and export’ button to customize and polish your video with Riverside’s Magic Editor.
How to Record Yourself on a Smartphone
Step 1: Download the Riverside.fm mobile app on iOS or Android. Once you open the app, you will be directed to log in or create an account.
Step 2: Select an existing studio or create a new one with the + button.
Step 3: Press the studio to join and accept permissions if necessary.
Input your name and enter the Green Room. Here, check your camera angle and whether your microphone and camera are on.
Once you’re all set, press the ‘Join’ button in the top right corner.
Step 4: Now you are in the recording studio. When you are ready, press the red Recording button in the lower left corner.
Step 5: When you are finished recording, click the Stop button in the lower left corner.
Step 6: A percentage score will appear at the top of your screen, showing how much of your video has been uploaded. Make sure to stay online until the upload is complete.
Step 7: Once everything is uploaded, proceed to the desktop site to edit your video.
What To Do After Recording a Video Yourself
1. Edit Your Video
Editing your video is an important part of the process, as it can totally transform your raw footage. Adding visual effects, subtitles, and inserting music or a soundtrack can develop the tone and pace of your video.
This is also the point in video production where you can erase any mistakes and target your content towards your intended audience. For example, if you want to reach busy working professionals, cut any long pauses in your video to increase your audience retention rate.
If you’re recording on Riverside, you can use our Magic Editor tool. This allows you to edit your recordings simply and effectively, without needing prior experience with editing software such as Adobe and Final Cut Pro.
2. Repurpose Your Video
Repurposing your video means finding new ways to reuse your videos’ content on other platforms or in other formats. This can include turning your video into a written blog post, but it can also mean taking a section of your recorded footage to upload to another different platform, such as Instagram or TikTok.
This way, from just one video you can create a variety of content to bring greater attention to your business or brand. Repurposing videos is not as time-consuming as shooting new content specifically for an individual platform.
You can create or expand your online presence on social media platforms by using Riverside’s Magic Clips tool. This is the perfect way to take short sections of your video and adapt them to the right format for sharing across social media platforms.
3. Export Your Video
Exporting your video allows you to save it in the right format for the platform where you intend to share your video. For example, if you want to upload to YouTube, save your video file as an MP4.
4. Create a Thumbnail for Your Video
A thumbnail is the first thing viewers will see, so it needs to be attention-grabbing. Make sure your thumbnail image is on-brand and targeted toward your intended audience.
Show friends or colleagues your thumbnail before you upload your video anywhere. You should ask them what they think this video would be about and see how well their answers match your video content.
5. Find a Home for Your Video.
The most popular platform for sharing video content is YouTube, but you might want to consider an alternative video hosting platform such as Vimeo to reach a different audience.
If your video is promotional or connected to your business, you could also upload it to your company website. Distributing your content across multiple platforms gives you the highest chance of getting people to engage with your videos.
FAQs on Tips for Video Recording Yourself
How Do You Get Used to Recording Yourself?
Keep practicing. It may feel awkward and uncomfortable at first, but the key to building your recording expertise is to get more familiar with your setup, script, and the act of putting yourself on camera.
You could also share your videos with trusted friends and colleagues to help you understand what you are doing well.
Where Should I Look When Videoing Myself?
Most video makers choose to look directly into the camera to build a sense of closeness with the viewer. For documentary-style videos, it is better to look slightly off-camera. Set a mark in your room, such as a sticker on your wall, to remind you of where to focus while you are speaking.
How Can I Be Confident When Recording Myself?
Imagine you are talking to a friend when you are speaking to the camera. Practice what you want to say before you record, and keep your notes close by. You might feel more comfortable reading directly from a script, in which case have your writing in front of you. Remember, it is ok to make mistakes. You can edit out any false starts or misspoken sentences in post-production.
Being thoughtful about your setup, like sitting in a familiar place and wearing clothes that make you feel good, can have an impact on your overall mood and body language. The more relaxed you feel, the better your camera presence will be.
How Do I Read Notes While Recording a Video by Myself?
If you're using Riverside you can easily upload a teleprompter script directly in your recording studio. You can position this teleprompter where you like on the screen, select a speed and font, then you're good to record.
Alternatively, can turn your phone into a teleprompter by typing out your script and uploading it to a free teleprompter app. This way, you can read your script as it scrolls up the screen at the same time as you record yourself.
You could also use your laptop to display a script. The upside of having your script up on a desktop is that you can make changes to it as you go along.


-(1).jpeg)